
Drones are popular for recreation, videography, and photography. But they’re not always easy to use. I went through a huge learning curve when I got my first drone. That’s why I’ve put together these instructions. By the time you’ve put these steps into practice, you should be able to control your drone and use it to take great photos and videos.
What You Will Need to Follow This Tutorial
You don’t need much more than your drone and remote control to follow this tutorial. However, you’ll also need an open, outdoor space for practice. Stay away from trees, wires, walls, and houses. Also, you might want to practice where there are few or no people to collide.
Recreational drone operators don’t need a license. You should register your drone before you fly it, though.
Some other requirements for recreational drone operators include:
- Don’t fly more than 400 feet above the ground
- Fly at speeds below 100 miles per hour
- Keep your drone in sight
- Don’t fly at night
- Don’t fly your drone for payment
- Flying in specific zones is prohibited
- Don’t fly over humans or moving vehicles
- Yield the right of way to unmanned aircraft
- Notify airports before flying within 5 miles of them
Step by Step Instructions for How to Fly a Drone
There are several things that you need to know about how to fly a drone. These instructions will familiarize you with your equipment, teach you how to get it off the ground, and demonstrate how to control it.
1. Register Your Drone
Before you begin flying, register your drone with the FAA. Recreational users must register any small unmanned aircraft system that weighs between 0.55 and 55 pounds. You must also indicate the registration number on the zone. The registration helps users stay accountable for any damage that their drones cause.
This video gives you complete instructions on how to register your drone.
2. Learn Where You’re Allowed to Fly
Every state contains no-fly areas for drones. Download an app to track no-fly zones and weather conditions. Some of the most popular apps for drone flying include:
- B4UFLY – indicates no-fly zones and flying conditions
- Hover – no-fly zone maps and real-time weather information
- UAV Forecast – Tells you the weather conditions for flying
3. Learn the Lingo

You’ll need to know a few flight terms to operate your drone.
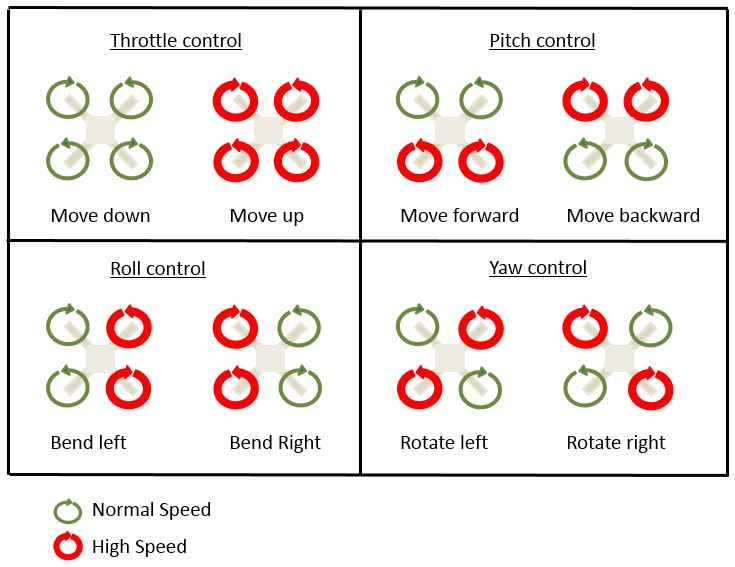
- Yaw – Controls the rotation
- Throttle – Controls the altitude
- Roll – Side-to-side tilt
- Pitch – Front-to-back tilt
4. Familiarize Yourself With the Basic Controls
Most drones have somewhat standardized controllers. Advanced models may have more features, but most of the controllers work similarly.
Read the instruction manual before you start flying. Your controls may differ from the ones that we describe below. In general, however, drone controllers work with two joysticks.
Left Joystick
The left joystick generally controls the yaw and throttle.
To rotate the drone while keeping it level, maneuver the left joystick from side to side. This allows you to point the drone in different directions while keeping it in the same place.
To make the drone go up and down, push the left joystick forward and backward. This will change its altitude. You can do it while you’re performing other maneuvers, such as rotating or tilting.
Right Joystick
Push the right joystick to the left and right to make the drone roll. This allows you to dodge obstacles without changing the altitude or pitch.
Move the right joystick up and down along the y-axis to shift the drone forward and backward. This comes naturally for most people when they’re flying the drone away from the controller while working the throttle. You may need to get accustomed to these controls when flying the drone toward you, though.
The image below shows how the different controls affect the drone’s elevation and movement.
5. Charge the Battery
The instructions should indicate whether you should charge the battery fully before you use the drone for the first time. It’s a good idea to start with a full charge every time you fly. Otherwise, you may cut your flying time down and end up frustrated.
6. Find a Decent Takeoff Spot
The instruction manual should explain how to position the drone for take-off. In general, you should place it on a flat, level surface. It’s easier to operate if it’s in front of you, facing the same direction that you are. Eventually, you’ll be able to take off from other positions. However, this is the easiest way to get the basics down.
7. Turn Everything On
Again, read the instruction manual to determine the sequence for turning on the drone and the transmitter. In many cases, you have to push the throttle down before takeoff. Then, turn the transmitter on and connect the battery. After you land, disconnect the battery before turning the transmitter off.
8. Take Off
Once you have connected the battery and transmitter, you can practice taking off. Push the left joystick forward to raise the drone. Control the roll and pitch with the right joystick to keep the drone steady. Don’t try to fly forward or backward yet.
9. Land
Land the drone by pulling the left joystick toward you. Keep the drone level as it slowly descends to the takeoff spot.
10. Practice the Hover
One of the hardest parts about flying a zone is keeping it steady while you hover. Practice this technique by lifting off until the drone is about 5 feet from the ground.
If you master the drone’s balance now, you’ll improve your performance as you learn trickier maneuvers. You’ll also protect it from damage because you’ll have excellent control.
11. Rotate the Drone
The next step after you’ve mastered the hover is to practice rotating the drone. Keep track of which side of the drone is the front and which is the back so that you can orient it with your controls.
Liftoff, and let the drone hover. Then, push the left joystick left or right to rotate the drone.
If you find yourself becoming disoriented as you try to maintain control after the drone has rotated, imagine that you’re sitting inside of it. You’re flying the drone as a pilot would. Maintain this feeling, and don’t overthink the controls.
It will become easier to create this mental image as you get more comfortable with the controls. Once you don’t have to look at your hands while you operate the drone, you’ll run it more smoothly.
12. Practice More Movements
After having hovered and rotated the drone, you might wonder, “But how do I make it move forward?” The drone moves forward when the throttle is hit and the nose pitches downward. Once you understand how to do this, you can start to play with new movements.
13. Get These Techniques Under Your Belt
Systematically practice the following techniques to gain more control over the drone:
- Move forward and backward in straight paths
- Taking off, moving forward and landing
- Taking off, rotating the drone and returning it to you
- Drawing a circle or square
- Draw a figure eight
Conclusion
Did you enjoy learning more about how to fly a drone? Understanding these concepts cognitively before you put them into practice with your drone can help you get started without confusion and hassle.
Read the article a few times before you try the steps with a drone. But practice will improve your performance and make you a more consistent flier. Let us know how this tutorial works for you when you get out and try it.